TL;DR
Using proper placement and targeted acoustic treatment, especially in small spaces like closets, can dramatically improve sound quality. Ventilation is crucial to prevent heat buildup and hardware throttling. Distance often beats absorption alone in noise reduction.
Ever tried working with a noisy, overheated rig tucked into a closet? It’s a classic DIY hack, but few realize just how much a little strategy can change the game. The secret isn’t just slapping foam everywhere — it’s where you put it, how you place your gear, and how you breathe life into that tiny space.
If you want your closet rig to sound clear and stay cool, you’ll need more than just foam panels. This guide is all about turning that small, often tricky space into a workhorse that’s quiet, cool, and effective. We’ll cover placement, dampening, and ventilation — the three pillars of a successful “rig in the closet” setup.
Acoustic dampening
& the rig in the closet.
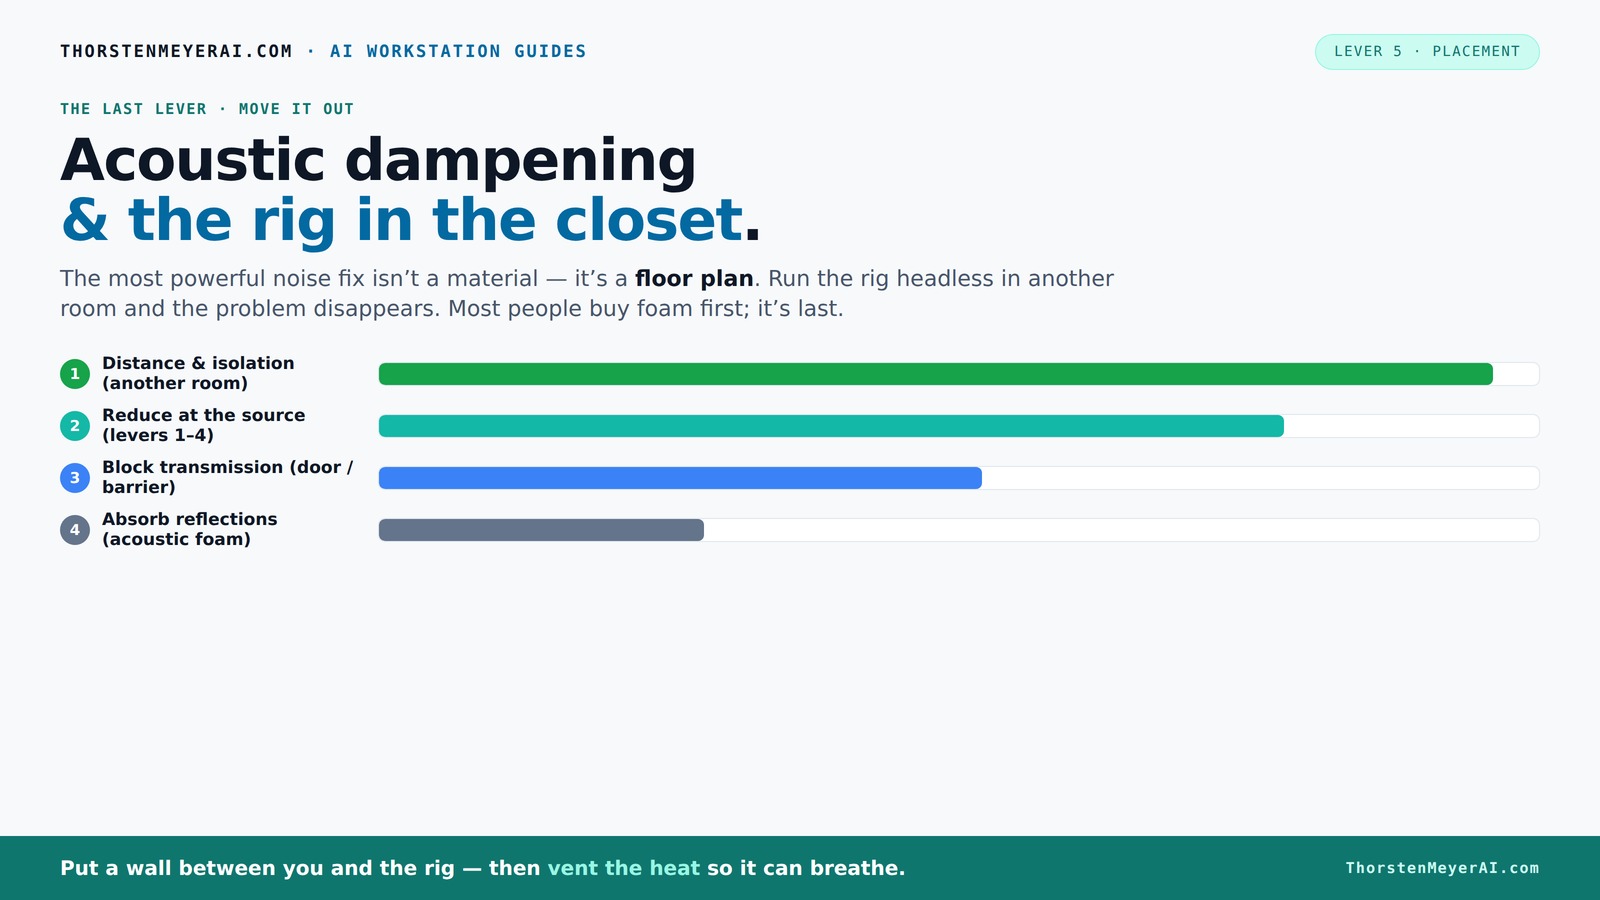
The most powerful noise fix isn’t a material — it’s a floor plan. A rig you can’t hear because it’s in another room beats any amount of foam. Tap the approaches in Part 1 to see what actually works.
(another room)
(levers 1–4)
(door / barrier)
(acoustic foam)
Contain the noise, not the heat
Key Takeaways
- Distance and isolation are far more effective than foam for noise reduction. Moving your rig into a different room can cut sound levels by over 20 dB.
- Always ventilate sealed spaces. Passive vents or exhaust fans prevent heat buildup that throttles hardware and causes noise.
- Target your acoustic treatment at the first reflection points and on surfaces your mic directly 'sees.' Heavy blankets and foam are tools, not the goal.
- Placement of your mic and gear dramatically impacts sound clarity. Experiment with angles, height, and distance for best results.
- Use a mix of materials — foam, blankets, bass traps — tailored to your space’s specific reflection and low-frequency issues.
soundproof closet panels
As an affiliate, we earn on qualifying purchases.
As an affiliate, we earn on qualifying purchases.
Why Distance Outperforms Foam for Noise Reduction
The best way to quiet a loud rig isn’t more foam — it’s distance. Moving your computer into another room, or even a closet, can cut noise levels by 20-30 dB. This reduction is significant because it directly impacts how much noise reaches your ears, making your workspace more comfortable and less distracting. The reason distance works so well is that sound intensity diminishes with increasing separation; the further the source, the less direct sound energy reaches you, especially for high-frequency noise. This means that even modest separation can dramatically improve your environment without additional treatments.
For example, I set up a small AI server in a spare closet. From my desk, I couldn’t hear it at all. But if I kept it on my desk, the constant whine was deafening, regardless of foam. Moving it into the closet and sealing the door made a dramatic difference. This highlights the importance of physical separation, which often offers far more benefit than adding layers of foam, especially in tight spaces.
This approach is especially perfect for AI work, where you mainly connect remotely. No need for fancy soundproofing — just good placement and a solid network connection. The tradeoff is that you lose immediate access, so plan your setup accordingly. The key takeaway is that strategic placement and distance can simplify your noise management and improve overall work quality.
acoustic foam for small spaces
As an affiliate, we earn on qualifying purchases.
As an affiliate, we earn on qualifying purchases.
The 'Rig in the Closet' Setup: How to Make it Work Without Cooking Your Hardware
Placing a powerful rig inside a closet sounds ideal for noise reduction — but heat is the enemy. A sealed space traps hot air, which can quickly reach levels that threaten hardware longevity. When a GPU dumps 600W of heat into a tiny closet, temperatures can spike past 90°F (32°C) within minutes. This rapid heat buildup isn't just uncomfortable; it causes thermal throttling, where hardware reduces its performance to avoid overheating, and can even lead to hardware failure over time. Understanding this helps you appreciate why proper heat management is crucial for a reliable setup.
To keep your rig cool and quiet, you need effective ventilation. Passive vents, like louvered panels, help by allowing some airflow but often aren’t enough for high-power components. Active exhaust fans create a more consistent airflow, pulling hot air out while drawing in cooler ambient air, thus preventing dangerous temperature spikes. Some DIY builders enhance this by adding ducting, thermostats, or even small air conditioning units to maintain stable temperatures. This investment in proper airflow can extend hardware lifespan and maintain consistent performance, avoiding the frustration of throttling or crashes due to heat.
For example, I installed a small, quiet exhaust fan in my closet door, connected to a temperature sensor. When the temp hits 80°F (27°C), the fan automatically activates, maintaining a safe environment. This simple, inexpensive fix prevents overheating, reduces noise from thermal throttling, and keeps the hardware operating at peak efficiency. Recognizing the importance of ventilation and implementing straightforward solutions can make all the difference in a closet-based setup. For more detailed strategies, check out this comprehensive guide to reducing heat and noise in a high-power AI workstation.
room ventilation fan for computer closet
As an affiliate, we earn on qualifying purchases.
As an affiliate, we earn on qualifying purchases.
Targeted Acoustic Treatment: Where and How to Place Sound Absorbers
Acoustic dampening in a closet isn’t about covering every inch with foam. It’s about smart placement that targets the most problematic reflections. The goal is to reduce echo and boxiness without unnecessary clutter. The first reflection points — the spots where sound bounces directly into your mic — are your best targets because these are the surfaces that cause the most coloration and reverb in recordings. If you treat these areas, you significantly improve clarity.
To identify these points, use the mirror trick: hold a mirror along the wall while seated at your mic. When you see the microphone’s reflection in the mirror, mark that spot for treatment. Placing foam panels at these locations on the side walls and ceiling minimizes early reflections that can muddy your sound. This targeted approach ensures your space is acoustically optimized without overdoing it, which is especially important in tight, confined spaces like closets.
Heavy soft materials like moving blankets, thick curtains, or even DIY sound baffles can be layered around the closet to absorb residual reflections and reduce echo. For low-frequency issues, installing bass traps in the corners is effective because low frequencies tend to accumulate there. The key is to treat surfaces that directly influence your sound quality, rather than attempting to soundproof every wall. This focused strategy maximizes your budget and effort, resulting in clearer recordings and more accurate monitoring.
soundproof door seal kit
As an affiliate, we earn on qualifying purchases.
As an affiliate, we earn on qualifying purchases.
The Power of Placement: Positioning Your Mic and Gear for Clarity
Where you place your mic and gear impacts your sound more than any foam. A common mistake is putting the mic in the corner or near reflective surfaces, which introduces unwanted echoes and coloration. Instead, position your mic in the quietest spot possible—away from walls and reflective surfaces—preferably with some absorbent material behind and around it to prevent sound bouncing back. This placement reduces early reflections that can muddy your recordings and monitoring.
For example, setting your microphone 6-12 inches from a foam-lined wall and angling it slightly can significantly reduce reflections. Keep your speakers or monitors off the desk and away from the mic to prevent sound bleed and echo. Experimenting with mic height and angle can reveal surprising improvements; even a few inches in position can change clarity dramatically. Using a small stand or mount helps you fine-tune these positions easily. The takeaway is that thoughtful placement of your mic and gear is often more impactful than adding more treatment materials, especially in small, confined spaces. Prioritize positioning as a core part of your acoustic strategy for cleaner, more professional sound.
Comparison: Foam, Blankets, and Bass Traps — What Works Best?
| Material | Best For | Cost | Limitations |
|---|---|---|---|
| Foam Panels | Mid/high reflections, first reflection points | Moderate | Doesn’t block low frequencies or sound leaks effectively, so it’s best used as part of a broader strategy. |
| Heavy Blankets & Curtains | Budget damping, reducing echo, softening surfaces | Low | Less effective at controlling low frequencies; they primarily absorb higher frequencies and reverberation. |
| Bass Traps | Low-frequency buildup, corners | Variable | Require more space, thicker material, and proper placement; they are essential for a balanced sound but can be costly and bulky. |
Choosing the right treatment depends on your space and budget. A mix—using foam for reflection points, blankets for general damping, and bass traps for low-end issues—is often the most effective approach. Understanding the specific function of each material helps you optimize your limited space without unnecessary clutter or expense. Prioritize treatments that target the dominant issues—whether it’s echo, boxiness, or low-frequency rumble—and combine them for a balanced acoustic environment.
Frequently Asked Questions
Do I really need soundproofing or just acoustic treatment?
Most closet setups benefit more from acoustic treatment than full soundproofing. Soundproofing involves sealing gaps and adding insulation to block noise entirely, which is costly and complex. Acoustic treatment reduces echo and reflections but doesn’t stop sound from leaking outside. For most home studios, a combination of placement, dampening, and sealing gaps does the trick.
Where should I place my acoustic panels in a closet booth?
Prioritize the first reflection points — behind the mic and on the ceiling above it. Use a mirror trick: hold a mirror against the wall and position panels where you see the mic’s reflection. Also treat side walls and the ceiling to reduce early reflections and boxiness.
How much absorption do I need in a tiny closet?
Focus on targeted placement rather than full coverage. Use foam panels at reflection points, add blankets or curtains around the space, and consider bass traps in corners if you notice low-end buildup. Less is more — strategic placement beats covering every surface.
Will foam make my recordings sound better?
Foam helps tame mid and high-frequency reflections, making recordings clearer and less echoey. But it won’t block low-frequency rumble or reduce noise leaking into other rooms. For best results, combine foam with other treatments and proper placement.
What’s the best way to handle heat in a closet rig?
Ventilation is key. Use passive vents or install a quiet exhaust fan with a thermostat. Ducting and small cooling units can also help. Regular airflow prevents heat buildup, keeps your hardware safe, and maintains a quieter environment.
Conclusion
Transforming a closet into a quiet, cool, and effective workspace hinges on smart choices. Prioritize putting distance between your rig and your ears, treat the most reflective surfaces, and make sure your hardware can breathe.
In the end, a little planning beats a mountain of foam. Your workspace becomes not just quieter, but more reliable and less stressful — a true home for your creative and technical work.